Saturday, March 29, 2014

Yoona SNSD baby G kiss me makeup tutorial

hello pretty ladies..!!! today i want to share an inspired makeup tutorial from Yoona SNSD baby G kiss me campaign.. it was a collaboration project but got cancelled, BUT me and other fellow bloggers who join the collaboration felt that we should post it anyway.. we have work hard to create these looks and happy to share it with all of you..!! but we can only gathers 7 ppl who we know join this collaboration, sorry if it's not a full member but we hope u guys will enjoy it..!!


this are the links of beauty bloggers who join this collaboration, don't forget to check them out..!! they are so pretty..!!

Bella Terentia as Hyoyeon
Shanty Huang as Sooyoung
Ardanella Purnamasari as Tiffany
Rani Hidayat as Seohyun
Velina Theresia as Yoona
Lintang Pratiwi as Yuri
Rere Dini as Jessica

oh btw this look is so cheerful and colorful..!! suitable for this upcoming spring season..!!! it's a pretty long tutorial because this look use a lot of colors for the eyes only and i want to explain it in photos so u guys will understand the steps and can create this look too..!! brace yourself and get ready girls..!!! =D

now i'm gonna show u guys the picture of Yoona first, then start the tutorial.. enjoy..~


and let's start with my bare face selfie..~~ i already prep my face with toner > serum > moisturizer > sun cream..


then, apply CC cream, i'm using CC cream from Em Cosmetics.. this was my first CC cream and become my favourite..!! you can see my review about this product on this link ..


after that i put on my laneige snow bb cushion for some coverage, because korean makeup is all about that natural beauty and non-heavy makeup.. so that's why i didn't use foundation for this look.. and also if you read my review about this product, you will know that it will be look oily, because they want to create a dewy look when you use it.. but since i'm not a big fan of dewy look, i will top it off with powder, stay tune..!!


and it's concealer time..!! as usual i'm using my L'oreal la touche magique perfect match concealer to conceal the dark area on my face, such as dark circles and acne scars.. i'm still hoping that they release this product here in Indonesia.. >o<


after concealing every dark spots, powder up girls..!! i'm using loose powder first (freshel bb mineral powder from kanebo) to absorb the oil and then top it off with my poreputty bb mineral powder (compact) using my beloved big brush..

duck face


^3^

now let's move to the tricky and long part, the eyes..!!! first put on the eyeshadow primer, i'm using urban decay primer potion..


oh and sorry for the bad image quality because i'm still using my phone to take every photos on this blog.. still try and figuring out how to use camera and photoshop to adjust the brightness, i'm not that good using computer programs, so forgive me for studying this long..>.<

now continue on the tutorial, after applying the eyeshadow primer, put on baby pink eyeshadow on the whole lid.. i'm using coastal scents 120 eyeshadows palette on this tutorial, so all the colors are from there..


and now the fun part..!! we will be using 4 colors which are yellow, orange, blue, and purple and by using small brush, in here i'm using an eyeliner brush E05 from sigma because we want to create a dot or small circle on the eyelids.. i will start from my left eye (left and right eyes have a different color on it), then the right one..
here are the color i choose :

yellow
blue
purple
orange
now let's start from the left eye, the first color is yellow, put/draw a dot on in the inner lid.. follow it with the blue color, remember don't make the distance too far.. then place the purple , and then blue again, but this time the blue has to be on the outer area of the eyelid.. and the last 2 colors are orange and yellow, put orange first a tiny bit above the last blue and yellow directly above the orange.. see these pictures below for a better explanation.. and that's it for the left eye..!!

left eye, yellow
left eye, blue
left eye, purple
left eye, blue
left eye, orange
left eye, yellow
now move on to the right eye, we still use the same colors as the above, so i'm only write down the steps and which colors first in order..
the first color is orange, also place it on the inner eyelid, then follow it with blue, do it from inner to outer and put the yellow, blue again, and finish it with purple which located on the outer side of the eyelid..

right eye, orange
right eye, blue
right eye, yellow
right eye, blue
right eye, purple
finally finished the eyelid area, now put on yellow on the lower lash line on both eyes.. and yes you will make another dots on the lower lash area.. >o<

yellow as the base
we will start from the lower left eye, after applying yellow color as the base, put on a dot of blue color on the outer side, moving inward around middle of the eyes put a dot of orange color, and another orange color around the inner area, not far from the middle one.. see the images below for further explanation..~

left eye, blue
left eye, orange
left eye, orange
now move on the the right eye, this time i decided to start from inner to outer.. put the orange color first on the inner, and because the outer side color also orange, i put the outer first and then put the last color which is blue in the middle..

right eye, orange
right eye, orange
right eye, blue
wow finally it's done..!!! now put on the eyeliner.. i'm using K-palette liquid eyeliner..


move on to the eyebrows, because it's a korean look, i will draw my eyebrows a lil bit straight and thicker than usual.. and finish them off with browcara from dollywink..


then it's eyelashes time..!! i have very short eyelash, that's why i'm gonna use fake eyelashes but i choose the most natural look.. i'm using local brand from Andiyanto, this is my favourite eyelashes, because it's light and felt like my real lashes..!!


then, i top the fake eyelashes and my lower lashes with mascara..


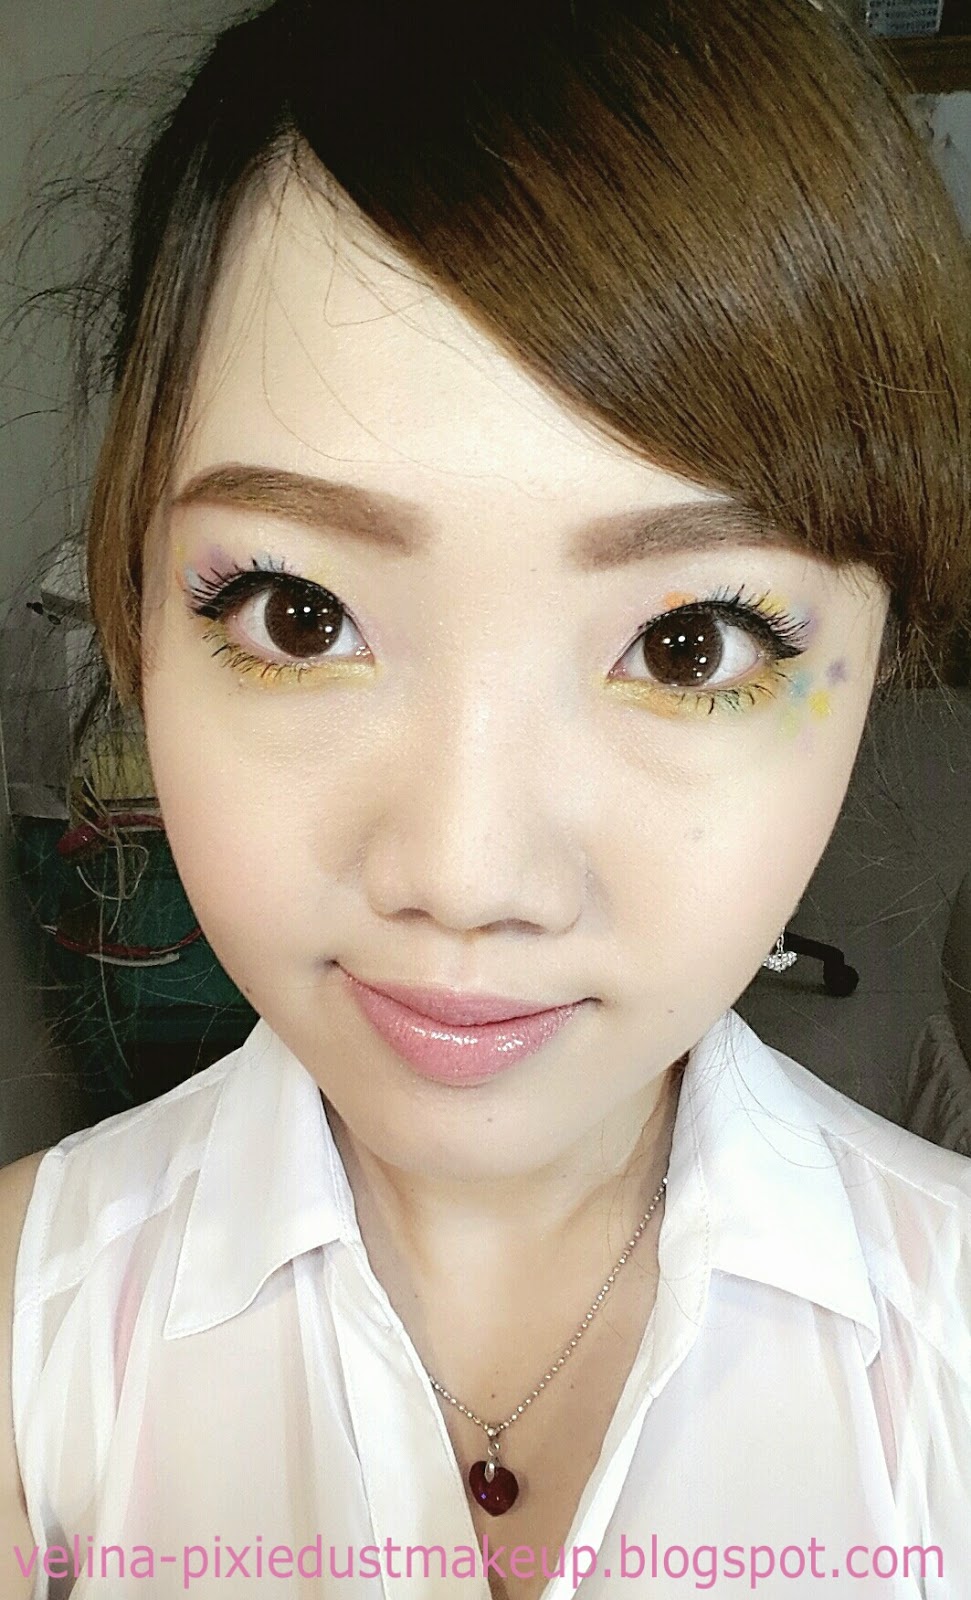
and to complete the look, draw 5 stars below the right eyes.. i will draw them with NYX jumbo pencil in cottage cheese color using small eyeliner brush.. then put some colors by using the eyeshadow, i use pink, blue, and yellow to color them..


and 3 final steps are put on the pink blusher, use soft pink lipstick, and lipgloss..


and you are finish..!! here's the final look..

i'm sorry to make such a long post.. but i hope u guys enjoy it and thx for reading my blog..!!! good luck and see you in my next post..!!


Wednesday, March 26, 2014

how to draw eyebrows by me..♥

hello girls..!!! today i want to give u guys a tutorial about drawing the eyebrows.. i got a few requests to do this tutorial, so here it is..!! first, i want to explain about eyebrows because i see so many girls can do makeup so good with their eyes and face, but never good on eyebrows.. usually they just draw it randomly or just leave it like that.. it's weird to have a face full of makeup but didn't do anything to the eyebrows a.k.a bare eyebrows..!!!

well eyebrows can change your whole look, even your whole makeup.. as you know the booming type of eyebrows right now is straight eyebrows, this type of eyebrows are fuller, straight (no arch), and thick.. this will make u look younger especially if u combine it with a simple makeup..
and there's an arch eyebrows, this type of eyebrows is usually thinner, this will make u look more elegant and mature.. also becareful with the length, because if the tail is too long then u will look sad..!!

so create the eyebrows that suits your face, it's ok to experiment because with that u will find ur perfect eyebrows.. well i hope with this tutorial, i can make u guys to understand more about eyebrows and how to draw it correctly.. let's start the tutorial..!!!

ok, first is my bare eyebrow, i have a super thin eyebrow and my eyebrow has been like this since i was born, not because i overdone (reshaping) them.. actually i was feeling grateful with it because i can draw my eyebrow quick and easy.. hehe.. but of course as you can see i need to reshape my eyebrow for a better look, i never pluck because i can't bear the pain, so instead i use a specified razor to shape into the right one.. (if you want to know which area i usually shave, leave a comment below so i know that u guys really need guide to do so..=))


and then i will draw from the bottom part first, from left to right.. but please draw in thin line and make sure your eyebrow pencil is sharp enough.. i'm using Viva eyebrow pencil in brown color, my favourite..!!

follow the dotted pink line


then continue to draw the upper part, also from left to right and as thin as possible.. for the upper part, u can adjust the height of your eyebrow, but u must remember if the eyebrow arch is too high u will look mean, except that's the look that u are looking for..~

follow the dotted pink line


so basically u have to frame your eyebrow first and then fill it in.. because filling in is easy, but to find the perfect frame, that's hard and tricky..!! and if u make a mistake just erase it with cotton buds, no worries because pencil is easy to erase.. oh also one tip for u guys, if u use pencil like mine, it's easier to draw on oily surface, by oily i mean after u put on bb cream or foundation, not after powder..!!

the frame

fill it in

after fill the eyebrow in, adjust the length of the tail, remember don't make it too long.. also fill and draw the front side but not too bold, the law of drawing eyebrows is fade/thin color in the front and bold and thick color on the back (tail)..

adjust the tail length

fill the front side

now i want to show u guys my eyebrow look, but it's not done yet..!! as you can see, the color is not spread well and not blending.. and i like to draw my eyebrow with a little bit of arch and a little bit straight on the lower line, i find it more suitable for my face..!!

not done yet..!!
this is when my favourite brush for eyebrow comes out.. it's an small angled brush with a super thick bristle, it's suitable for blend the color from eyebrow pencil.. but i buy it from my makeup teacher long ago so i don't know where to buy it in here.. but no worry, you can use other brush as long as it's a small angled brush it still can work..!! just brush it through the eyebrow from left to right, keep it in 1 direction to even out and blend the color, then put a few strokes on the front to soften the color..

the angled brush with hard bristle


and it's finish..!!! this is the full look, u can put an eyebrows mascara after it like what i always do on my makeup tutorial.. and remember girls, nobody has an identical eyebrow on their left or right eyes.. usually the difference is vary from the length, the height, or even the thickness, so it's ok if ur eyebrows look a little bit different between left and right, just try to even them out.. nobody born with that perfect eyebrows..!! it's normal girls..~


as you can see, even my eyebrows has a slightly different height, but i can even them out a little bit.. well, thank you for reading this post, and i hope this post is useful.. post a comment below if u have any question, good luck..!!!~

Thursday, March 20, 2014

Laneige Snow BB Soothing Cushion review

hello girls..!!! today i want to review about my all time favourite which is Laneige Snow BB Soothing Cushion..!! i bought this product last year in HongKong, this product is a HIT in there because i saw the advertisement everywhere, even on TV..!! oh and this product is starring Song Hye Kyo, probably most of u guys already know her from K-drama Full House, she's so pretty.. btw, i was interested and finally bought one, has been using it since then..!!

this product claim that it got 5 benefits which are whitening, sunscreen, sweat-proof, soothing, and makeup effects..

now u can buy it at laneige counter in Indonesia, i bet u could find it easily in Jakarta.. but for Surabaya, don't worry, they just opened their first counter on Sogo Tunjungan Plaza..!! yay..!! it's easier now..~


here's the video advertisement :


so that's the advertisement for laneige bb cushion, now let's start the review..!

first, of course we will start from the packaging..!! all is written in english, don't worry..!! i bought this one from Jakarta because my old case is broken, it accidentally fell from table and can't close properly now.. oh and this is the reason why i can make a full review on this product..!!

i love the color of this product, it's main color is silver and black, look elegant yet simple.. and if u guys look closely to the pattern, they look like snow flakes..!!


ingredients


now, let's open the box and see what's inside..!!

tadaaaa..!!~~


inside the box u will get a case/compact with the bb cushion in it and also the puff, and they give 1 refill bb cushion too..!! and of course a brochure that explain this product, how to change the refill, etc..

and for the compact itself, here's the pictures..~


the main color for the compact is white with a little bit blue color.. it looks like a usual powder compact but it's a bb cream, it's more convenient to bring it everywhere..


and for the cushion itself, it looked like a big sponge with large pores on it.. so when u squeeze or press it the bb cream will come out, and there's a trick when u feel that the sponge is dry, try to flip it or take it out and switch the upside with the downside.. sometimes u have to do that because if u used 1 side all the time, of course it will dry out but on the outside only.. u still can use it..~


now i will write down the positive things about this product :

- great coverage, it even cover better than my cc cream
- reasonable price
- contains sunblock, SPF 50+, PA +++
- did give a soothing/cooling effect when apply it onto the skin, feel so fresh
- smells good

the negative things about this product :

- because i have oily skin, using only this product will make my skin looks so oily, so i have to set my face with powder after applying this product
- thicker than my face shop bb cream, so i only use it when i need it.. i don't like wearing heavy product on my face everyday
- i don't really like the white color on the compact, because the bb cream can spread around it and make it look dirty and messy

now, the question is did i want to buy this product again?? ABSOLUTELY YES..!!! i prefer using this product than using foundation.. i really do love the coverage and it was afterall did lighter than foundation..
well.. this is all my review about Laneige Snow BB Soothing Cushion.. if u have any questions please leave it in comments below.. thx for reading my blog, stay pretty and good luck..!!


Tuesday, March 4, 2014

~Pasjel cherry tender night facial cream review~

hello beauties..!! today i'm gonna review a phenomenal and famous cream product from Thailand, yes u know what it is, it's Pasjel..!! i saw that there's so many reviews already about Pasjel everbright blue body cream but since my skin is fair already, i don't really need it.. then when i was browsing instagram, i saw that Pasjel actually has so many types of cream and i'm interested to this cherry tender facial night cream and finally bought it from @ninelohops .. this cream proof that it can reduce the cause of ance, freckles, and melasma..

i already using this cream probably almost 1 month and i use it along with cream from my doctor and i don't have any problem.. but the result won't be fast because i have 2 creams from my doctor and can't be used at the same time, so for example today i use A cream from my doctor, then tomorrow B cream from my doctor, and on day 3 i use this Pasjel cherry tender, and keep doing this everyday.. no problem at all for my face, thx God.. hehe..

well, my face condition is i don't really have many acnes, just the scars and enlarge pores.. so i can't give u guys weekly update or a major update after using this product because it can't really be seen.. sorry..>.< but after using this product for almost 1 month i do feel that my acne scar is slowly dissapeared, acne scars or pigmentation won't be gone fast, so u have to be patient.. so i'm happy with this product..

and let's start the review~

Pasjel Cherry Tender Night Facial Cream

packaging photos :


the box and jar

net weight

explanation

ingredients

manufactured by

overall the packaging is quite simple and give a clean impressions, the box have a hologram sticker on it to make sure it's an original product not fake (and yes ppl already faked this product, so becareful girls.. they even fake the sticker too..!!).. but it come in a small package!! i was surprised to be honest that it was this small.. i thought that i will use it less than a month but it's not, a small cherry size is enough..!!


the jar explanation

directions

the cream
the jar itself has same color and design like the box and has explanation all along the side and also the directions to use it.. u put the cream at night before sleep and wash it in the morning.. it's just that simple..~


oh this cream is easily absorb by the skin and it's not sticky or oily.. i love the smell and color of this cream, color is pink and the smell is so yummy..!! 

the positive from this product are :

- smell great
- did give an effect, my acne scar is start to faded away
- don't have any contradiction with my creams from doctor
- easily absorb by the skin
- and it's PINK..!! i love pink.. lol..XD

the negative from this product are :

- come in a very small jar
- quite pricey but the quality match the price
- to be honest, the packaging is too simple for this fabulous product and that's make it look cheap, i hope they can improve the packaging to be better

and did i want to buy this product again?? PROBABLY, don't get me wrong, it's all because i don't have acnes, the acnes appear only when my period is come.. and when my acne scars gone, i think there's no point for me to keep using this product, BUT i will buy it again when i encounter lot's of acnes and scars.. i like this product..~

and thx for reading my blog post.. stay pretty, will see u soon on my next post.. good luck..~